15 May 2014

Pasta!

When I truly have the time to spend in the kitchen without worrying about work, vet bills, speeding tickets, etc., I like to take on the time-consuming, yet rewarding, type of cooking I can't do on a weeknight when I'm working. Pasta is one of those things that, although it is available anywhere one shops, (hell, I think you can buy it at TJ Maxx...) it is fun getting lost in the process and making things that might be more difficult to come by.

A couple of years ago I needed to be at home all day while a guy came to lay carpet, and I took advantage of the time to make ravioli. I made two different fillings: beet with goat cheese and butternut squash with carmelized onions. With the fillings made and chilling in the fridge, I set out to make the pasta. Once it was made and the ravioli filled and cut, I laid them out in single layers and stuck them in the freezer. When they were frozen, I dumped them into ziplock bags and left them in the freezer. I could take them out and toss them into cooking water, a few servings at a time. They were better tasting than frozen ravioli you can buy at the store, but just as easy to cook and I knew every ingredient in them!

Occasionally I break down and buy pasta made with spinach or tomato. The color always draws me in, but I am usually left wondering how much of the vegetable was actually used. I can't taste it. Was there enough spinach used to make the pasta any healthier? Unless you make it yourself, you can't know.

So I looked through a bunch of different recipes and combined a couple to make a truly good-for-you, spinach loaded, pasta. I'm not going to lie--I still couldn't taste the spinach. But I know there is a boat load in there, and the color is gorgeous.

Spinach-enriched Pasta

2 c loosely packed spinach

1 egg

Dash of salt

3/4 c flour

Place spinach, egg, and salt into a blender and purée until smooth. Mound flour on work surface and make a well in the center. A marble board or granite countertop is great for this as the cool stone helps prevent sticking without using a lot of extra flour. But don't worry, a wooden cutting board does just fine too.

Using raw spinach gives the pasta an intense color.

Use a fork and mix, slowly incorporating flour from the inside of the mound of flour, until all flour is mixed in. Eventually I use my hands and knead until all flour is used since it gets too stiff to work with a fork. Wrap dough in plastic wrap and let rest on the counter for 30 minutes.

Remove dough from plastic wrap and divide into quarters, putting three of them back into the plastic. Working one quarter at a time, put through a pasta machine according to manufacturer's directions. I start on the largest setting and run my dough through 4 times, then through two times on each of the other settings.

This is one reason to work with small pieces of dough.

When I got through the last setting, I spun my machine rollers around and made one quarter angel hair, and three quarters fettuccine. As I got done cutting each section, I hung the pasta to dry.

Having a rack is handy to help with the drying--cooling racks for cookies will work also.

If the pasta is used within the first day or two, it takes about three minutes to cook--it's super fast.

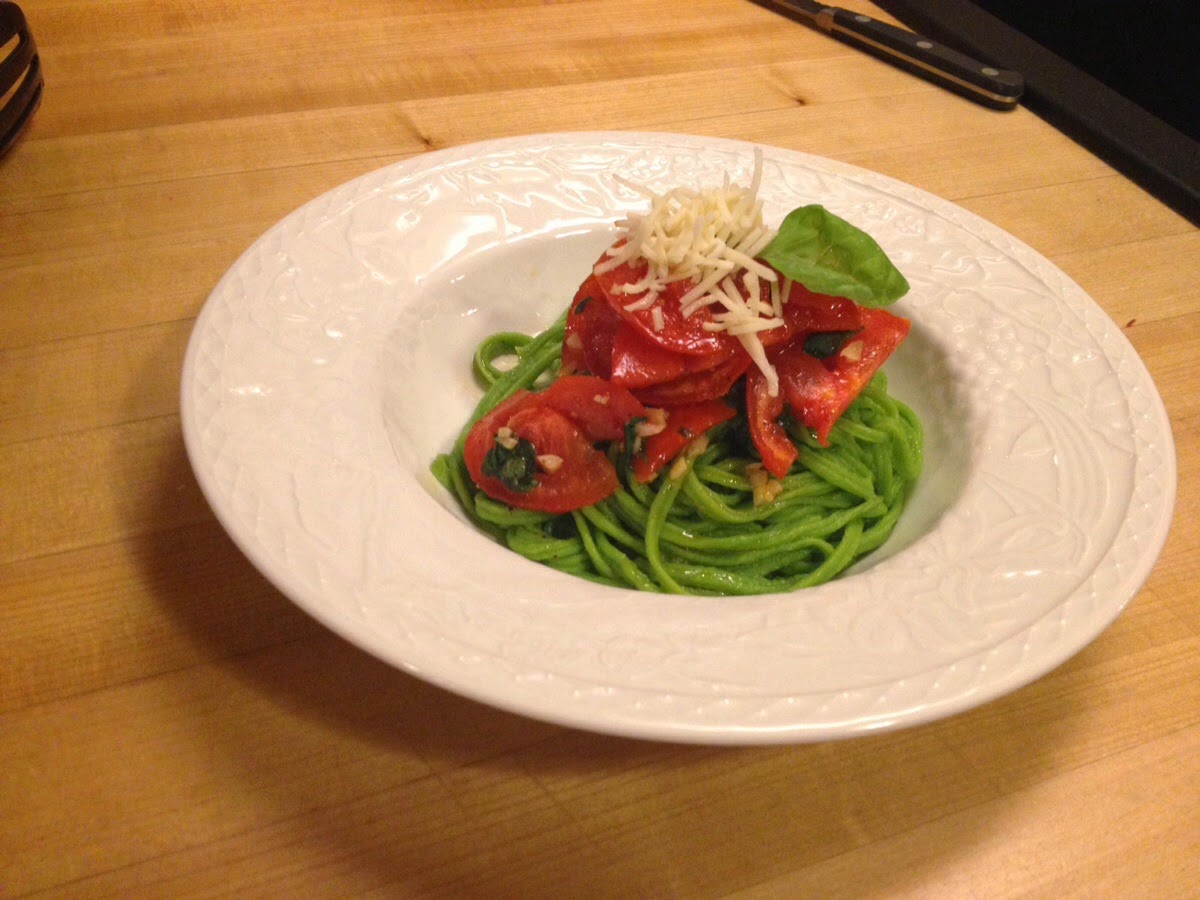
For the above dish, I cut two tomatoes into small wedges and quickly sautéed them in olive oil with two finely chopped garlic cloves and shredded fresh basil. When tomatoes were warm, garlic softened, and basil wilted, I tossed the pasta in and warmed it all through. Using tongs, I pulled the pasta out and put it in dishes, then piled the other ingredients on top with shredded Parmesan and fresh basil.

This was the perfect fresh-flavored way to enjoy fresh homemade pasta. Once the garden has come in this summer, I will try beet pasta and tomato pasta.


Sourdough English Muffins--or How I Tried To Start Up The Cooking Thing Again

And...I'm unemployed. My contract with The Denver Center has once again come to an end. Instead of running off to San Diego for the summer, I'm hanging out here in Denver. In March we began a kitchen remodel, and we are slowly finishing what was an epic project. The new kitchen, although not quite finished, makes me so happy. It is much more user-friendly, and some of the upgrades have had benefits I didn't even know they would.

Because the days are warming, the sunroom is the perfect place for things like painting, starting seedlings for my garden, and making a sourdough starter and proofing bread...

Started--lemon cucumbers, Armenian cucumbers, eggplant, cauliflower, Anaheim and bell peppers, basil, sage, tomatoes and tarragon. And a cyclamen for color!
Rosemary, marjoram, chives, thyme, and oregano sit on the wood burning stove, soaking in the sun. I believe the marjoram is attempting world domination.
Happy, lazy basil. A little short at the moment as I made curry the other night and shredded a bunch for garnish.
...or snoozing.
I love bread. I don't really eat much of it, but I love it! Since I have learned appropriate ingredient proportions for different types of bread, making it has become a very fast and enjoyable pastime for me also. With all this extra time on my hands, I thought I might try something I haven't tried before, but always wanted to. Sourdough!
The process of sourdough always seemed so time intensive and complicated to me. And let's be honest--I grew up on central coast California (San Francisco) sourdough. I live in Denver and I know darn well the sourdough could never be the same. But I'm trying it anyway. After doing some online research, I decided to try the King Arthur's Flour method for a starter. You can find it easily, and I started mine with rye flour--all subsequent feedings done with all-purpose flour.
It's easy, so easy. Even as lazy as I am I have kept mine going beautifully. I have made waffles and pretzels with the discard--recipes from KAF website, and I am currently doing a final feeding to make a loaf of sourdough bread tomorrow.
This brings me to the English muffin experience. I wanted something to do with the discard (I really hate wasting it) and decided I would try the muffins. Using the KAF recipe, I got started. I put all of the ingredients--minus the sour salt--into the Kitchen Aid and let the dough hook go at it. This is my favorite way to make bread, especially when I think I don't have the time for bread. Once all the ingredients are combined, I let the hook go until the dough is smooth. It does the kneading so I don't even have to flour a board, work it, and clean it up.
In this case, I used close to 7 cups of flour which is just a bit too much for my size Kitchen Aid to knead easily. This is where my kitchen remodel really came in handy! On each side of the stove, we laid in granite countertops, and I flopped the ball of dough directly onto the cool surface and worked it for a couple of minutes. Nothing stuck, the dough smoothed out, and I put it into a greased bowl and into the fridge.
 
A quick wipe of the countertop and all was cleaned up. For a true cook, or a wannabe like me, granite, marble or quartz countertops can be useful tools.

Refrigerating 24 hours before allowing to rise is optional, but helps develop the sour flavor if that is what you are looking for. This is the tough part for me--waiting! Aargh!! I want to watch the dough rise today, shape it and cook them up. Bread products fresh from the oven, or griddle, are so good, I want them now!

But I will wait...patiently...-ish.

**NOTE**

I put the dough into the bowl, as pictured above, thinking it would not rise much due to the fact it was going into the fridge. Boy, was I wrong! An hour later I opened the fridge to find the dough nearly doubled in volume, being smashed by the glass shelf directly above it. Oops!

Sourdough English Muffins

1 c sourdough starter, fed or unfed

2 c lukewarm water

2 tbsp sugar

1 tbsp yeast

1 tbsp salt

1/2 c nonfat dry milk

1/4 c butter softened

7 c all purpose flour

1/4 tsp sour salt (citric acid) OPTIONAL--I don't have this so I refrigerated the dough 24 hours to build the sour flavor

Cornmeal to sprinkle on cookie sheets

Put all ingredients, except cornmeal, into bowl and mix. I put mine into the Kitchen Aid and used the dough hook to mix everything well. Once it was mixed and I could hear the motor struggling to mix through, I turned it out onto the counter to knead it into a smooth ball. Alternately, you can mix completely by hand or completely by a large mixer until dough is smooth and elastic. It shouldn't be sticky--if it is, add more flour a tablespoon at a time.

Place dough into a large, oiled bowl, cover, and let rise for about an hour in a warm spot until it doubles in size. If you choose to refrigerate dough, put it into the fridge immediately after putting in bowl and covering, and leave for 24 hours. Remove the next day, and let sit at room temp for an hour before continuing on.

Deflate dough, turn out onto floured board, and let sit for about 5 mins. Divide dough in half, and working with one piece at a time, roll to 1/2" thick and cut with 3-3 1/2" cutter. (I used the lid ring from a Ball jar, and got 25 from my dough)

Place on cookie sheet that has been sprinkled with cornmeal, and sprinkle more cornmeal on top. Cover and let rise about 45-60 minutes, (2 hours if you refrigerated the dough) until they get puffy.

Heat griddle or frying pan over medium-low heat (350 degrees) and place as many muffins overheat as will fit. Cook the muffins 10-12 minutes on each side, until an instant read thermometer reads 190.

**I read a tip somewhere and thought I would try it--it worked well. When the first side is cooking, place a cookie sheet on top of muffins to keep them flat and rising evenly.

Cool on cooling racks and wrap. They're great 4-5 days at room temp, or you can freeze them!

Or give a few to your friend, Roo.